


Lisa Kiley – April 2024
Originally published in Horsemen’s Corral Magazine – link to magazine
Early spring is a great time to think about fencing projects. If you are thinking about adding additional fencing or maybe even creating pastures for the first time, you might be a little nervous about how to get started. Depending on the style of fence you are planning on adding, there are some options that lend themselves to DIY and can help save a significant amount of money by not having to hire someone to install the fence.
Cashman’s own Terry Glassford has been helping to educate customers for years. A lifelong horse owner with experience in breeding, raising, and training stock horses, Terry has over 40 years of experience as a member of the Cashmans Horse Equipment Team and has been involved in leadership roles in Delaware County 4-H for over 20 years. Over the years, he has been able to help trouble shoot some of the most frequently asked questions that customers have brought him when it comes to installing fencing.
Here are some of the tips that Terry shared about installation of fencing and specifically about how to install electric braided fencing which is a common horse-safe fencing that can be installed with minimal tools and just a couple extra hands to help:
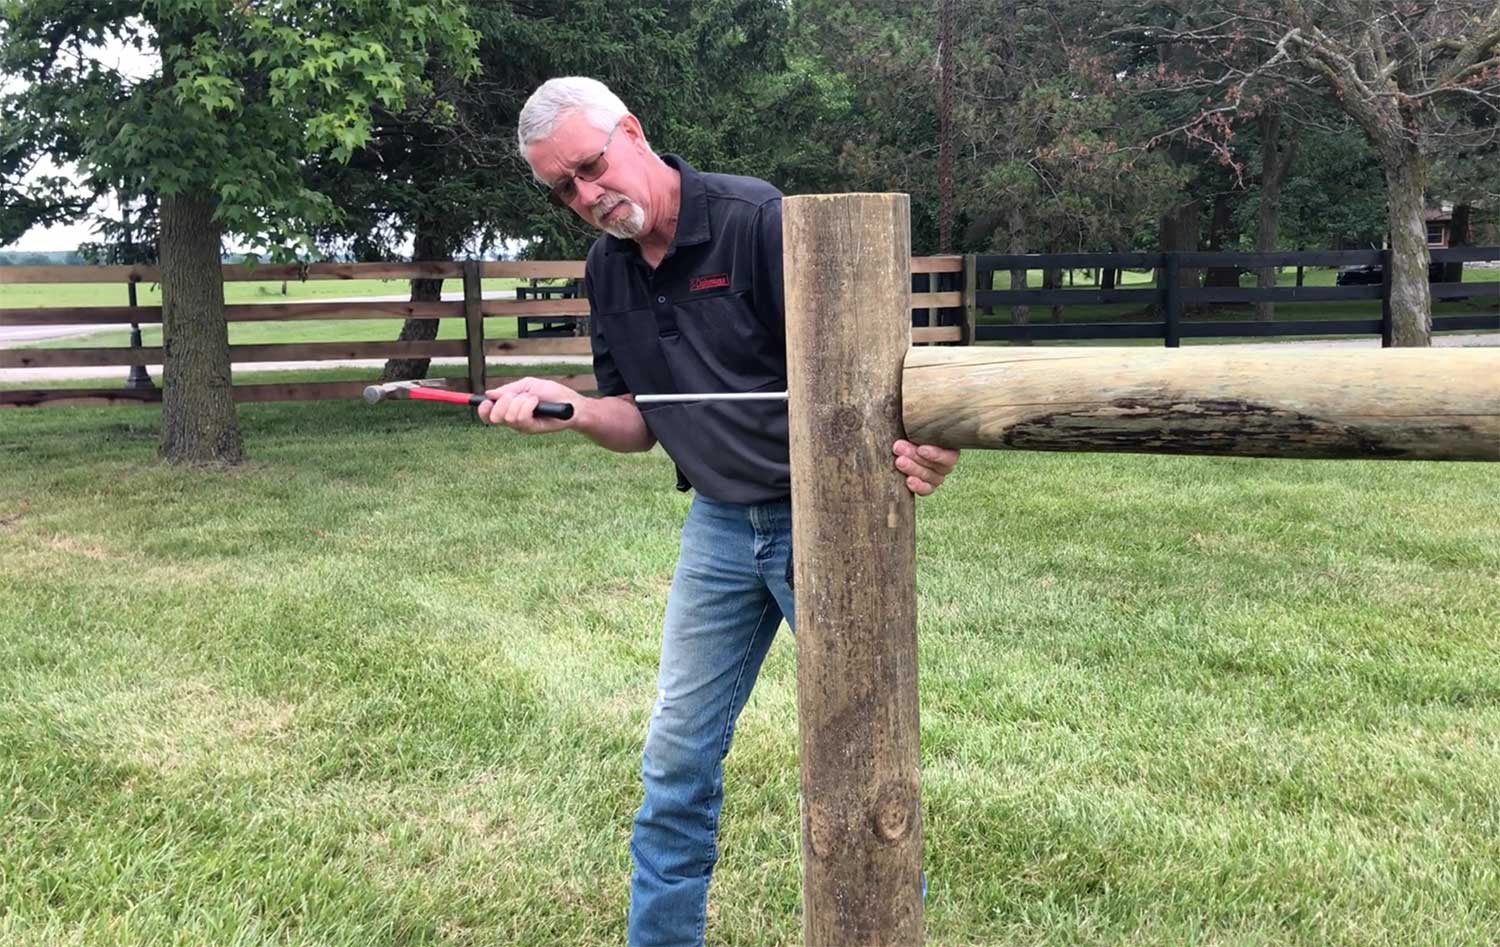
Corner Posts – Terry shared that finding high quality posts that are the right size is going to be the first step to starting your project. Corner bracing requires a heavy-duty wood anchor post that should be at least 6” in diameter and two line posts on either side. The post must be at least 4’ in the ground, so the length of the post will be determined by how tall you want the fence to be above the ground. He advised that when possible, pounded posts are always going to be more secure than drilled, setting the corner properly is integral to the strength of the whole fence. Terry also reminds everyone to call before you dig to avoid hitting any underground lines on the property.
H-Braces – H-Braces or horizontal brace posts, requires using brace pins that will fit into both the top of the corner post and the end of the brace post. Terry recommended using two 5” pins going into the actual corner post on each side and two 10” pins that will go into the two supporting line posts on either end of the H-Brace. He advised measuring and predrilling so that the braces can be easily tapped into the posts. Typically, these horizontal posts are 4”- 7” from the top of the anchor post and can depend on how many strands of fence are being installed.
Line Posts – When it comes to making sure that lines are straight, Terry recommends measuring down the line and across the pasture with a string to ensure it will be straight and look good. Next, set markers depending on how far apart you want each post to be. Terry advised that large pastures with flat land can allow for larger spacing between posts which is more economical, but rolling hills and rougher topography requires fence posts that are closer together, as do higher use areas. Quality treated wood posts are preferable over t-posts for both strength and safety and must be driven below the frost line for stability.
Tensioning – The next step is setting up the roller insulators on the corners and ends of the fence. The corner will require two roller insulators that will be placed on the outside of the corner post. Posts that are set where a gate will begin are called ‘END Posts”, but they are the best starting point. This is where you create a termination back to itself by using copper split bolts, then it can be stretched from that point to the corner starting with the top line. Once it has been run down the line, it should be tensioned to the corner. After the top line has been tensioned, the post insulators can be attached to the rope fencing and then screwed into place on the post. Terry advised that the reason to wait until after tensioning the top line is so that the insulators sit where the rope aligns to the post, creating the best-looking top line. Measure the placement of the other lines based on how many strands are being run on the fence.
Electrifying – When electrifying the lines of the fence, coated copper lead out wire is used to connect the lines from one to the next. Copper lead out wire is also used when taking lines under gates to the other side. Wires be buried at least 6” deep, but Terry highly recommended 12” for high traffic areas and stated that it should also be protected with a piece of conduit when going underground. Next, select a fence charger based on the joule output needed. One joule would roughly translate to one mile of fencing per strand. Terry shared the final step of using copper clad ground rods in a three-rod system to ground the fence. The first rod should be placed 25ft from the charger and the next two should be placed 10ft from the first rod in a triangular formation. He recommends finding a low spot that holds moisture to keep the fence working most effectively.
If you would like more information about installing your fence, there are many resources on our website at Cashmans.com. We also have a handy fence calculator that will help to determine how much fencing you will need for your project. Come see us at Equine Affaire in the Celeste building, you might even see Terry by the fencing display and get to ask him your own fencing questions in person. Our team is available to help enable you to get your next fencing project completed this spring.